Friday, May 30, 2025

Friday Project Roundup - May 29, 2025

    It's been a busy week around here as school is coming to a close and these's school event after school even for the kids. I haven't had much time for crafting, and much of my crafting time was devoted to wool laundry for putting away the winter clothes. Temperatures have been pretty consistently above the 50s lately, so I'm washing all the wool for the end of the season and packing them away in their plastic bags to wait out the moth months. I also took the opportunity to wash the pouches to prepare them for lining. I also need to set up a warp for the strap to the little bag for my kid, but I need to stop at the hardware store for a few things to make it easier first, and I just haven't had the time. Next week I also might starting working on the pants I've been meaning to repair for my spouse. But that's next week. Here's what I got done this week:

New Pattern!

    I released a new design for the first time in an embarassing long number of years this week. I've actually had this (and a few others!) kicking around in my drafts folder at like 80% done for a couple of years, but it just took me a while to build up the confidence and just get it all done!

A photo of a pink and white hat, with the color stripes arranged in a chevron. There's also a child's peg doll and a crocheted heart in the frame as stylistic additions.

    I'm calling it the Begonias Hat and it's available on Ravelry. It was originally made for one of my children, one who is very femme, so the original colors were pink and white, but I've done mock ups in several colors and it works really well with a variety of shades, in both high and low contrast. The slip stitch pattern used to create the chevrons is easy to memorize and, at least for me, fun to do. It's worked from the brim up and uses just 200 yards of lace weight yarn, and less than that if you're using a larger diameter yarn. I hope you enjoy!

Spinning

    I started on the red portion of my "red, green, and in between" project. I got all the punis carded and rolled for all 3 colors a while back, but I only recently got started on spinning it up.


    At this point, I'm planning on spinning the red, then the green, then the blend. Based on my previous experiments, though the green especially looks fairly distinct in the blend now, I think that quality will be muted pretty significantly in the actual spin, because I did blend them fairly well. I did about 4 passes each on the carders per puni, so what you see on the outside of the puni is no promise of what lies underneath at that location. I'm pretty excited to see it spin up, even though I know the end result likely won't be very visually exciting - just a heathered warm brown. But it will be fun to watch it develop!


A smallish copp on a thin spindle, made up of the red fibers. The completed single shows variation from a bright candy red to more of an Auburn color.

    I started with the red, and the layering on the copp makes it seem like there might be some slight variegation in the final skein. The extent to which this happens depends largely on how many of these longer sections of disparate color are matched with each other and which are barber poled instead. I won't know until the end, so that's a fun surprise to look forward to.
    I also noticed that it seems like the color was mostly taken up by the longer, coarser fibers and the finer, shorter fibers have more of the natural color peeking through. I wonder if that has anything to do with the qualities of the fiber itself, or if it has more to do with how it was laying in the dye pan? It's something I intend to keep an eye out for next time I dye these fibers. If it is related to the qualities of the fiber, I'm very curious to research why that might be.

Knitting

    Finally getting started on the socks I spun all that shifting-color yarn for!


    The pattern is Södera Socks by Vilma Vuori, and calls for a gauge of 7.5 stitches per inch, which I think is basically the bare minimum for socks, but I don't think really displays the lace to it's full potential. Obviously looking at it pre-blocked in this swatch won't give you the proper idea, but I have been stretching it out as I worked on it, seeing how I liked the interplay of the stitches, and at 7.5 stitches per inch, it's just really not hitting for me. I'll definitely keep that for the foot of the sock because I'm not trying to wear them out instantly, but I'm trying some larger needles to see what size I feel shows off the lace best so I can use that for the leg of the sock (you know, the part anyone will see anyway) and that portion will be exposed to much, much less friction, so if the gauge isn't as durable as it could be, that's probably not a huge loss. 
    Once I've got that sorted, I'll start on them properly, probably next week, and then I have plenty of time to work on them because I won't really need them until September or so. It gets so hot and muggy in the summers, I'm usually wearing slides the whole time. Leaves a funny suntan on my feet, too. 


    Also added 3 new yarns, all of them green, to the scrap blanket this week. That brings this strip up to a total of 48 inches long. That's more than half, and I'm more than halfway done with the total of strips, too. I've been working on this blanket since 2021, but now that I'm at 10 out of 13 strips, I'm starting to have to seriously consider how I'm going to finish the edges. Do I want all one color, and if so, what? White or black are obvious choices that "go with everything" but that sounds so boring. I actually might just continue in scrap yarns for the edges too, because it feels like that's the only way to properly match the energy this blanket is already giving.  I have time to think it over, but it's seeming like there's a possibility it could be finished in time for this winter. That would be nice, as the quilts are getting pretty heavy use (both of them already have new areas in need of repair because of course after all that sustained effort I don't get any kind of reprieve, let's be real here) and having something to swap out for them so they can be treated a little more lightly would be nice. Of course, that also means I have to immediately get started on my next scrap blanket once this one is finished, and I'm genuinely not sure what I'm going to do for it. I've been working on this for literally 6 years, because I actually started this blanket in 2020, frogged it because I didn't like how it was turning out, and started again in 2021. I know I definitely want to work on it in pieces again, that aspect has been very satisfying, but I don't know if I want to continue the theme of sampler strips, work in more quilterly blocks, maybe do a more intentional, coherent theme? I definitely still have months at a minimum to think about it, but I'm kind of a planner and not having a plan at this point is kind of giving me hives. I'll probably come to a decision about it soon, but as always, I reserve my right to change my mind if it's not working out!

Thursday, May 29, 2025

Thursday Tool Talk - Stitch Markers in Crochet

     I feel like I see mention of stitch markers a lot less frequently in crochet, as compared to knitting, but I use stitch markers while crocheting just as frequently, and I think it benefits the crafter in all the same ways. 


What are stitch markers?

    Stitch markers are a tool (also called a "notion") to help crocheters keep track of some part of their work. You place the marker in or around a stitch (or sometimes group of stitches) to mark repeats, rows/rounds, make counting easier by placing them every set number of stitches, or to mark the right/wrong side of the work. People also sometimes use them for tracking increases/decreases, marking areas where surface crochet, buttons, or embroidery will go, or keeping track of where the beginning of the round is. Markers in crochet are embedded temporarily into the fabric, and have to be removed upon completion of the project, if not before. They are reusable, and can last for many years if they are well taken care of. Stitch markers for crochet can be had relatively cheaply from big box retailers, at more mid-range prices (and accordingly more aesthetically appealing forms) at local yarn shops or other mid-range craft marketplaces like Etsy, and there are even some jewelers who make high-end notions from precious metals like silver and gold for the more discerning crocheter. But what do they look like?

Locking Stitch Markers


A photo of teal and orange locking stitch markers by the company Clover. There's a diagram on the package showing them in use. The markers themselves are made of plastic.
Padlock shaped locking stitch markers. Photo credit Clover USA

    The most common type of stitch marker for crochet by far is the locking stitch marker. They come in multiple shapes, though the most common I've seen are pear/lightbulb and padlock. Both shapes can be used the same way, and the choice in shape seems to be an aesthetic and/or cost decision, as not all brands make both shapes, and both shapes are not always made in every material. Some people do say that they have difficulty manipulating one shape or the other, while others say that the shape doesn't matter and they are partial to both. If you're uncertain, it may just be a matter of trying it out for yourself.

Pear, also called bulb or lightbulb, shaped stitch markers, made by company Knit Picks, and pictured with a carrying case that has a design of knit stitches stamped on it. The markers themselves are made of metal.
Pear/bulb shaped stitch markers. Photo credit KnitPicks.


 Spiral or Split Ring Stitch Markers

A package of pink, blue and white plastic split ring stitch markers made by the company Clover. The package has a diagram of the markers in use.


If locking stitch markers aren't your jam, as they are for many - the chief complaint is that the locking mechanism is a little fiddly, which can be difficult for people with a variety of abilities to manage - then perhaps spiral stitch markers, also known as split ring stitch markers are for you. They are used in the same basic was as locking markers, however instead of locking on to the stitch like a safety pin, these markers are slid in and around, a motion some people find easy while others find fiddly. Some brands will have a taper on the outer edge of the spiral to make getting into the stitch easier, while others will have a knob at one or both ends in order to keep the stitches from sliding off. Some brands will have a mixture of both. Which of these types is most useful is a personal decision, as factors in your gauge, stitching style, fiber being used, etc. will impact which works best for you. But what if any of these are outside your budget? There is a solution.

Doing It Yourself

    The kind of markers available to the crocheter who does not want or is unable to purchase stitch markers is luckily something just about every crocheter has lying around the house somewhere. That's right, it's a simple piece of string. Like the knitting version, a simple piece of string woven in a stitch or around a group of stitches functions just as well, and if kept to a good length (not so short that it easily works it's way out of the stitch, but also not so long that you struggle to keep it from tangling) it can stay well embedded in the work even through a long project that is brought many places in a project bag, etc. This is also a great alternative when you're traveling because it does not show up on metal detectors or x rays, and security will never question why you have string coming out of your crochet project, though I have gotten comments asking why I have so much metal on my knitting projects while using soda tabs for stitch markers. So how does it work? Here's a picture of the method in action:


    It looks a bit messy, but they're removed at the end with much less fuss than weaving in ends, so it's a cost I'm willing to bear. A contrasting color is obviously best for visibility, but even the same color can work in a pinch. Plus, they're cheap to replace if one falls out, or if you need to make new ones for a project requiring more than you already have of any kind of marker. Hope this can help, and happy crocheting!

Tuesday, May 27, 2025

Tuesday Tip - Circular Start in Crochet 2 Ways (Including "Magic Loop"!)


    Back in 2020, I created a tutorial for the magic loop beginning, which you can view here if you found the video at the top of the post helpful. However, the camera I was using at the time was not very good, and some of the photos are too grainy to really show what you need to see. Additionally, I'd like to show a second option for circular starts, because there are certain situations in which the Magic Loop is not actually the better option of the two. I no longer have the capacity to edit video at this time (rest in peace, you beautiful warrior of a laptop! 😢 ) so this will be limited to a photo tutorial only, but should I regain the ability to edit video again, I will update this post.

So, what is "Magic Loop"?

    "Magic loop" is the name for a few different techniques, depending on whether we're talking about crochet or knitting, so keep in mind that context is important when discussing "magic loop." In crochet, "magic loop" is the name for a method of creating an adjustable ring to work your starting crochet into. It starts out fairly large, so that you have the ability to work your stitches within it comfortably, then once you've finished your first round, you tighten the starting ring to close it, forming a seamless rosette beginning.

    I've seen some people classify this as an "intermediate" or "expert" technique, saying that beginners should start with the second method I will describe instead, but to be perfectly honest, I find that technique a little more difficult because it creates a very small, cramped area to work into, and sometimes I find myself having to "scootch" my stitches around to make room for them in the tiny starting circle. This method is a little fiddly the first few times you do it because you haven't built up muscle memory yet, but I very quickly learned how to do this without looking, so I'm positive it will soon be easy for you, too, even if you've never crocheted before.

    To start with you're going to need to combine your yarn with a hook suitable to get gauge for your project. If you're practicing this technique for the first time, I recommend worsted weight to aran weight yarn (CYCA size 4, 10 ply to our commonwealth friends) and a hook that gets you a comfortable tension. I've seen people prefer US G (4 mm) all the way up to US K (6.5 mm), depending on how tightly you crochet. Whatever size hook is comfortable for you with the yarn you've chosen is fine.


    I have two appropriate hooks next to the yarn. This is worsted weight cotton, I think it might be Bernat's Handicrafter Cotton, but this is deep stash and I've lost the label many moons ago. Generally speaking, I would use the larger hook, the G, for this weight of yarn, particularly if I am making a blanket or garment when I want a mix of drape and density. Depending on the stitch, I might go for a larger hook if I wanted a lacier look, but generally, I am comfortable with this hook at this weight. However, it would be a bit looser if I were to be making amigurumi or another item that I'd like to hold it's shape. By using the smaller E sized hook, I will achieve a firmer fabric that can hold itself up, even in a drapey fiber like cotton, and it will not allow stuffing to show through. If you're using this start for an amigurumi or other stuffed toy, you will probably also want to choose a similarly small hook. I will be using the larger hook for this demonstration though, because it makes the stitches easier to see.

    Next, we have to talk terminology. The process isn't difficult to do, but it is difficult to take about when I'm not over your shoulder and able to clarify "no, I mean this part right here." We will call the portion of the yarn that ends in a cut end the "tail." We will call the portion of the yarn that returns to the ball, hank, or cake the "working yarn." We will call the portion of the yarn that we will be working our stitches into "the loop." I know this can be kind of a lot to juggle mentally, so refer to the image below if you need a visual.

An image of the working end, loop, and tail, each labeled, show with a single loop
for a single loop
An image of the working end, loop, and tail, labeled on a double loop
for a double loop

 
    There are two methods of starting the circle, using either one loop or two. One loop is best for "sticky" yarns like non-superwash wool or brushed yarns, and two loops is best for "slippery" yarns like cotton, silk, or nylon. There are photos of how the two methods look below, but the way they work is the same. Using whatever method is easiest for you, you will create a large open loop and pull up the needed number of chains to count as your first stitch. When you do this, the working yarn will, of a necessity, be strung across the top of the loop. When you work your next stitch, you will want to work around both the strand of the loop and the strand of the working yarn that doubled back to create the first chain. 

Image showing the first chain on a single loop
for a single loop

Image showing the first chain on a doubled loop
for a doubled loop

    Once you have made the needed number of stitches, you will hold the stitches, or some portion of them, in your non-dominant hand, and in the dominant hand, you will pull on the tail, gently but firmly, until the gap is closed. If using a bulky yarn and/or many starting stitches, the center may not close completely. This is normal, and has to do with the fact that the stitches take up a certain amount of space.  That's why most patterns that start this way will have a starting stitch count under 10. The only time a pattern will call for a large number like this is if the hole in the center is a design feature for one reason or another. It may be more difficult to fully close a doubled loop by only pulling on the tail. In the photos below, I show an alternate method for closing the loop, if just pulling on the tail only gets you halfway there.

First stitches complete on a single loop, ready to be pulled tight.
for a single loop
The first stitches complete, waiting to be pulled tight, on a doubled loop
for a double loop
Loop pulled tight, on a single loop
Loop pulled tight on a single loop
Loop pulled tight on a doubled loop, but only half of the loop was pulled tight. There is a long loop hanging out of the side of the loop. No worries, the next step will correct this.
Uh-oh, there is a long loop hanging out of the side of the loop. No worries, the next step will correct this.
The inner, smaller loop has been pulled, shrinking the loop that was outstanding, at the expense of the one that was once pulled tight. This is just as it should be, and will be corrected in the next step.
The tail has been pulled a second time, and it now looks identical to a single loop adjustable ring start.
By pulling the tail a second time, it now looks identical to a single loop adjustable ring start. Hooray!


    From here, you have two options. You can work discontinuous rounds, meaning you will slip stitch into the starting chains, then create new starting chains for the next round, work that, and slip stitch into those chains, and so on. This method is more common in older patterns, particularly in lacy doilies, but is still used today. The more common method these days though is the continuous rounds. In this method, you will treat the starting chains exactly as if it were a regular stitch, and work around and around in a continuous spiral until the end of the pattern. It can be easy to lose sight of the beginning of your round, making it hard to count if you have the right number of stitches and making frogging difficult. For this reason, many people use a stitch marker to mark the beginning of the round. You will need to either move the marker up or add a need one every 5-10 rounds, however. When working in continuous rounds, the beginning of the round moves visually to the right every round, due to the nature of the crochet stitch; when you work flat, these isn't an issue because the stitch moves "to the right" on one row and then "to the left" on the next. but things stack up in continuous rounds because there are no re-balancing rounds. This also doesn't happen with discontinuous rounds, because of the starting chains and the slip stitch breaking up the continuous spiral.

Visual of the start of a discontinuous round
Step 1 of the next discontinuous round: slip stitching into the starting chains of the previous round.

Showing the starting chains of the next round.
Step 2, whatever starting chains your pattern calls for. From here, the next steps are identical

Beginning of next continuous round: a stitch worked in the next stitch.
If your pattern uses continuous rounds, you simply work into the next stitch as your pattern describes.

    This isn't necessarily a problem, not by any means; some patterns take advantage of this fact in order to produce cool visual or shaping effects. But it is something you need to be aware of. A common beginner error for both designers and crocheters is working a stuffed toy or other continuously crocheted round object, and the color work isn't "lining up." Designers may forget to mention any balancing actions they have taken (such as moving the beginning of the round one stitch to the left every round, working an increase on one half of the piece that's balanced by a decrease in the other half, etc.) and crocheters may not know to do so, ending in disappointing results. But if you know this is a quality of continuous rounds, you can say yourself stress.

    The other way to start working in the round is less common these days, but very common in older patterns, especially for hats and doilies. I'm not sure it has a formal name (though if you know of one, let me know in the comments!), but let's call it "fixed ring" to contrast with magic loop's other name: "adjustable ring." It involves chaining between 4 and 8 stitches, slipping into the first, and then working into that space. See below:

Image depicting a 4 chain loop.
A loop this small is generally used for 4 to 6 starting stitches.

An image depicting a 6 chain loop.
A loop of this size would generally be used for 6-10 starting stitches, which is the usual range of starting stitches for items in the round. 

An image showing an 8 chain loop
A loop of this size would generally be used for 8 to 12 starting stitches, or if you wanted a larger space to work in for 6 to 10 starting stitches.

    For this demonstration, I'll be using the 6 chain ring to hold 8 half double crochet stitches.


    A neat thing you can do with this method (and any method where you're crocheting over or into a starting chain) is to make your stitches over the tail from the slip knot, so that it encases the tail, and you will have woven it in by the time you finish the row or round! It's a neat little trick you can do with nearly every end in you encounter in crochet, except for the final one.


    It functions identically to the magic loop, aside from not being adjustable and not always being completely closed, as you can see below. If your tension is slightly different to the designer's you could end up with an open loop where there isn't supposed to be one or with not enough space for the stitches you need to fit into it. This is a great start for when you want an open space at the center of your round or tubular item, as can be seen on some doilies, messy bun hats, etc. In those cases, often the starting chains are greater than 8 to ensure the opening is the correct size and isn't completely filled with the stitches. 


    In most cases, when a pattern specifies this kind of start, you are totally free to substitute in the magic loop, if you are more comfortable with it. Similarly, if you find the adjustable ring/magic loop method fiddly and hard to work, most of the time you can substitute in this fixed ring method, though you will likely need to do a little trial and error to find the number of chains that creates a fixed ring of the right size for the stitches you're starting with.
    
    If the pattern called for a very large number of chains forming a starting loop, you generally cannot substitute in magic loop, as the chains are to create a specific diameter hole in the center, which magic loop would not likely achieve. The photos below show the visual difference in this kind of open loop.


    Did you find this helpful? Was there something I missed? Let me know! I look forward to hearing from you.

Monday, May 26, 2025

Monday Reads - Make, Sew, and Mend by Bernadette Banner

    This is another one I found while browsing the shelves at my local library, and it's the newest book they had. I was honestly a little shook that they both a) had such a new book at this small, rinky dink location and b) had this particular book in a section that was last updated sometime in the 2010s.  


Cover of Make, Sew, and Mend by Bernadette Banner
photo copyright WorldCat.org


    Whenever I see a book that's written by an influencer or other celebrity that purports to be an expert on something, I'm more than a little wary that the selling point of the book will be "this person wrote it!" rather than any actual expertise contained inside, but this was actually a genre-defyingly really good tutorial book.

    The sections progress in a way that makes sense, with skills building upon skills, and there are plentiful, really good photos in the book. There are techniques for seaming, with quite a lot of detail for a variety of seam finishes; design details like pleat, gathers, and tucks; alteration hints like how to add pockets to a pattern that does not describe that itself; and even nice little finishing touches like making your own fabric buttons.

    For something that I thought was just going to be an empty little feather in the cap of a YouTube star, I was pleasantly surprised. If you're an old hand at sewing and mending, I doubt there's much this can teach you, but that's fine because you're not the target audience. If you're someone who wants to get into sewing or even just mending your clothes to help them last longer, but aren't quite sure where to start, this is a great primer that holds your hand every step of the way, providing helpful details about things like what to look for in supplies and when to use specific techniques. If you're someone with an intermediate level of skill and looking to expand your horizons, this is great too, as many techniques are explained both on the machine and by hand, allowing you to make decisions about which is the better technique for which situations with much greater confidence. If you're looking to make the leap to advanced by adding unique touches to things like matching fabric buttons, adding pockets, or adding trim or decorative stitching not called for in a pattern, then this book will also give you the knowledge you need to confidently start branching out in that direction. 

    In conclusion, I think it's a neat little book that would do well on the reference shelf of nearly anyone who sews at any capacity below "professional." Nice work, Ms Banner! Thanks for defying my expectations. To find this book near you, either in a library or for sale, check out it's entry on WorldCat.org, a neat little website that lets you search library catalogs and helpfully also links to online and local sellers (where applicable) that list books with that ISBN for sale.  I've found lots of interesting books to borrow via Inter-Library Loan through this site, so if it's not available locally, but you're interested in reading it, bring this info to your local library and see if they can have it sent over. 


Happy Reading, and have a good week!

Friday, May 23, 2025

Friday Project Round Up - 23 May, 2025

    I was silent on the blog for a while because I was building up a buffer of posts so that if something happened, like that I got sick or had something come up in my everyday life, posts could still go on, and I'm glad that I did because I immediately got sick and wasn't working on anything for more than a week. The first of those posts went live this week and I was so grateful it was there. Plus, now I've got time to read some longer books to review, so look forward to that in a few weeks. Anyway, here's what I've been working on.

Crochet

    The MAL that I'm a part of is going strong. I finished my first head wrap, the Diamond Lace Bandana by Viv Crochets:


    I thought the increases at the beginning of each row to keep in pattern were a nice touch, but I have never been a fan of this kind of shaping. I'm not really sure why, I think it's just a personal preference. There's really no other way to achieve this kind of shape with filet lace though, so that's not a ding against it, I just found it unsatisfying it work on. The lace is easily memorized and works up really quickly, especially if you use worsted weight, but I used some Premiere Serenity Sock I had in deep stash, and it still worked up decently fast. I also modified the edging to use the first two rows of the Star Edging by Katandia. I would have done all of it, but it felt a bit heavy. I frogged back row by row and found that the two rows looked good, so I left it at that. 
    The other pattern we're working on is Picot Bandana by The Turtle Trunk and I decided to add a little bit more color to it:

The bandanna, with alternating bands of black, navy blue, turquoise, grey, and white.

    Modified the edging of this one too, with just a simple single crochet, chain 3, skip 1 edging. It's hard to see in this photo because it curls under easily, but once I've given both of these their baths, I'll take some better photos and post them in the next project round up. I'm really pleased with how well the colors worked out, because I was kind of winging it, but I think it looks pretty good. It will definitely be nice in the winter, as this is more of the Serenity Sock and also some Hobbii Winter Glow left over from a commission. 

Dyeing

    I washed up some more of the fawn alpaca fiber, and was curious how it would take dye, so I used two colors to represent the whole rainbow: red, which usually takes up quickly and is an overpowering color, and green, which takes up slowly, and is easily overpowered. I would have preferred to use yellow, as it's the most easily overpowered of all the dyes I have, but I was worried it would be difficult to see on the fawn, so I opted for green instead. 


    The red mostly took well, but some portions look undyed still. I'm uncertain whether it's because the dye takes up so quickly that it wasn't able to penetrate to some of the fiber, or if I didn't use enough dye for the weight, or if some of the fiber wasn't able to effectively take up the dye. Maybe even a combination of the three. 

    The green took up in the fiber much better overall, which leads me to believe the issues with the red is likely a combination of taking up too quickly and not enough dye for the weight. It seems like alpaca perhaps needs more dye than wool in order to get comparable colors. I have already carded these into punis, as well as setting aside a third of each and blending it together to see what a blended fiber looks like once it's spun up. I'm not expecting any surprises on that front, but having it to hand will be nice. Once I have a handle on how the fiber dyes up, I'll be dyeing some to make a sweater dress one of my children requested. 

Spinning

    I started on the red, though I haven't gotten very far yet


    That's maybe 5 or 10 grams out of a total of 36 grams to be spun. I'll be plying this yarn back on itself to make a two ply. I didn't bother dividing up the fiber because there won't be all that much in the end, so I can ply it from my hand into a 2-ply ball once it's gotten plenty of rest, but if it was going to be closer to a full sized ball (50 grams or more, for me) then I would have divided it in half and spun two separate copps. There's no yarn-related reason for that, it's just about what I can hold on my hand easily. I know some people use tools to create a facsimile of Andean plying but I have never got on with those, so I don't bother with it.  Hopefully I'll have this one done so I can move on to the green by next week. The one I'm most wanting to spin is the blend, but that's why I'm saving it for last; otherwise, the other two are in danger of languishing forever!

    Hope you have a pleasant Memorial Day weekend, if you're celebrating. Sound off in the comments about what you're working on this week.

Thursday, May 22, 2025

Thursday Tool Talk - Stitch Markers for Knitting

     Another new series I'd like to get into. This will be a space for tool reviews, but also a place for general tips on use, care taking, and tips for DIY tools and equipment. In fact, it's that last thing I'd like to talk about today. Like many these days, I'm on a pretty tight budget, so the more I can squeeze out of each penny alloted to crafting, the better. There are many tools which are beautiful, well made works of art that I would love to buy for myself, but my landlord simply does not appreciate the beauty and necessity of a well made tool the same way I do, so alas, we cope. So, to start off this series, I'm going to start with a project that I feel is the simplest and cheapest to do, if not the most aesthetically appealing. If you're not a knitter, then unfortunately, this post is not for you and I'll see you tomorrow. However, I have plans for posts on tools, both DIY and commercially available, for knitting, crochet, sewing, and spinning, so next week, there could be something for you, so keep an eye on this space!

What Are Stitch Markers?

    Before we get off and running, I thought it would be best to look at what stitch markers are used for and the different styles of marker on the market to give some background on the subject, so that we're on firm footing for discussing the DIY options and their best use cases.

Single Piece, Ring, or Continuous Loop Stitch Markers

    This style of stitch marker has multiple names, but they all look very similar:

Plastic rings in two sizes; teal for the larger and pink for the smaller. Both are designed to fit over a knitting needle between stitches.
photo copyright to Clover USA for their product Jumbo Stitch Ring Markers

    These markers are designed to sit on your knitting needles in between stitches to mark off different sections of the work. They are commonly used to separate lace repeats, to make counting easier; separate sections of shaping, such as before and after raglan lines; placed every set number of stitches, for example every 10, every 25, etc. to make counting the total easier; or placed at one end of the work to designate which side is the "right" or "front side." The most common way to use it to designate the front is to place it on the right side of the work when viewed from the front with the mnemonic "right side? right side!" i.e. when the marker is on the right needle, you are viewing the "right" (as opposed to "wrong") side of the work.
    They come in multiple sizes for a few reasons. The first is that if the ring is too small, it won't be able to fit onto the needle; conversely, if the marker is too big for the work, it can cause tension issues like laddering, slide over or past the stitches it's supposed to be between, and be more difficult to pass from needle to needle generally. However, they are typically not sized specifically for each needle size, because until the ring is quite a good deal larger than the needle, there's no harm in the ring being oversized, and in fact, being slightly larger than the stitches can help to slide them from needle to needle because they are typically not stretchy. So, while it's important to match the size of the ring to the size of your needles/project, there is a bit of flexibility in which size marker to use, particularly at the top or bottom of the size range, where personal preference plays a bit more of a role in sizing choice.
    Sizing is usually either 2 sizes (regular and large, or regular and small, depending on brand) or 3 sizes (small, medium large). Small is usually sized to fit sock needles, approximately sizes US 0-4, unless the other size is large (or occasionally "jumbo"), in which case "small" is what others would call either "regular" or "medium." These markers are usually for the most commonly used needle sizes of US 4-9 or 10. Any markers that fit above a size 10 would be "large," "jumbo," or some other indication of larger size, depending on brand. Most markers top out somewhere around a US 13 needle, though there are sellers that sell limited amounts for needles that are larger, for that niche market.
    These are the most commonly used marker for knitting, and unless specified when a pattern indicates to "place marker," it is usually this type they have in mind. Ring markers are not very aesthetically pleasing, however, which has spawned a variation of the type.

Hanging Stitch Markers

A card with 5 hanging stitch markers. The hanging portion is an enamel pin front of 5 differently colored cats, all of which are hanging from their own jump ring or split ring; it is unclear from the photo exactly what kind of ring the cats are attached to. The card is being held by a light skinned hand over a grassy field for a background, shot in bright sunlight to show the gleam of the enamel.
photo copyright to JAdamsCollection on Etsy

    In the pursuit of cuter notions, several small business owners have filled the gap in the market by providing aesthetically appealing stitch markers in a variety of styles. Love cactuses? There are hanging stitch markers with those. Prefer wood beads for a more natural feel? You can definitely find that. Donuts? Fairies? Skulls? Robots? I've seen all those and more. Whatever your style is, there is a very good chance someone on the web is selling plastic, enamel, beaded, or silicone versions of something you'd love to see dangling off your needles. 
    Most of these are attached to either a jump or split ring and function the same way as ring markers, though there are hinged or lobster claw versions which act like locking markers (described further below) or, rarely, you can sometimes find hanging markers that function like spiral markers (also described further below) but for logistical reasons, this is uncommon. 
    The main downside to this is that the dangling piece(s) can snag on your work, or otherwise be "in the way," so this is a style not suited to everyone or to every project. The potential for snags is higher on lace worked at a loose gauge, so if you're a fan of this style, you could just limit it's use to projects at a tighter tension and/or without heavy use of yarn overs, though ultimately it does come down to personal preference.

Locking Stitch Markers

    These are a favorite of the bicraftual, because these markers work well in both knitting and crochet. Unlike ring markers, these do not sit on the needle nor do they follow the progress of the work as it develops. They are locked in place on a stitch or group of stitches, and remain there, marking that stitch or group until you remove it. In knitting, it's usually used to mark off increases or decreases to make them easier to count, the bounds of a short row, or placed every 10, 25, etc. rows/inches/centimeters to make counting them easier.

A clear package showing a pile of locking stitch markers, in orange and teal. Some are open, some are closed. Aside from the branding elements on the package, there is also a diagram showing the markers in use on knit fabric.
Photo copyright Clover USA; the packaging shows them in use on knitting.


    These are usually made of plastic, typically in bright and fun colors, though if you look hard enough (and are willing the shell out the higher cost) you can sometimes find them in all metal construction, similar to a safety pin. People who love these stitch markers tend to really love them, using them as ring markers as well, as needed, and they are definitely versatile in that respect. If you had to have only one style of marker in your notions bag, I can see why some people would choose these as their go-to.

Spiral or Split Ring Stitch Markers

    The name might be deceiving. Many don't quite look like a spiral, and they are also not all that visually similar to the kind of split ring you'd put your keys on, however they do work similarly to a keyring for your stitches

A package of pink, blue, and white spiral stitch markers. Besides the branding elements, the package contains a diagram of the markers in use.
Photo copyright to Clover USA


       These work identically to a locking stitch marker, but require a different motion from the hands to place them. Some people find locking stitch markers fiddly to use and find spiral stitch markers easier to use or easier on their hands, while other people find the opposite. If you've tried one and not liked them, they're usually cheap enough that grabbing a pack of the other type to see if they work better for you is usually worth it. The only case in which neither would be helpful is if you don't like the extra weight hanging from the project or are otherwise not in the habit or in need of marking elements in the work for your own convenience. 
    So, now we know what stitch markers are, what the types are, and how to use them, but how does that lead us to DIY? Those things look pretty industrially made. I can't make enamel pins or molded plastic in my home! Well, who said the DIY versions have to look the same?

Doing It Yourself

    What led me to making my own stitch markers was that the downside to markers is that, due to their small size, they're pretty easy to lose. I don't have the budget to be replacing these items all the time, even at their relatively low cost, but I rely heavily on ring markers to make counting easier and separate repeats, so what was I to do? Well, necessity is the mother of invention, as they say, and she's had a few kids in this family.

Soda or Other Drink Tabs

    My local schools are basically always collecting soda tabs for one initiative or another, so I've got a jar going where I collect them. One day I realized that soda tabs are basically two ring markers merged together. Would it be possible to snag a few from this year's collection jar and use them for knitting?It turns out yes. Here's one where I used them to mark the center spine of a shawl-based kerchief:


A pink kerchief with the center spine clearly delineated by two soda tabs.

    And here's one where I used it to separate the shaping I had going on in a sweater:


A blue and brown sweater, being worked from the neckline down. The work has not progressed to the armpits yet, but it's close!

    This is a raglan yoke before the division for the sleeves, so I've got the raglan lines and the sleeves themselves marked out, to make the joining under the arms a little easier when I get to it. I've even used soda tabs as round markers for socks worked on size US 0 needles, as well as lace worked on US 8s with lace weight. The thin profile of the tabs make up for the relatively wide diameter. The two photos above are worked on US 2s and US 4s, respectively, and you can see the tabs really snuggle up against the stitches and don't cause any laddering. For sizes larger than US 8, I use the tabs from condensed soup, or a similar can pull-tab, as the pull ring is usually larger. But what if you don't want ring markers? What if you need a locking or split ring marker instead?

Just a Piece of Yarn

    I am not a fan of either locking or spiral stitch markers, because the added weight of the markers on my project is hard on my hands, but there are times I need them to mark various things, and in those situations, there's nothing better than Just a Piece of String. I'm not kidding, I do this all the time, and if you weave it in amongst several stitches, rather than just one, it's pretty secure. I most commonly need to measure length, and I'll mark off 1, 6, or 12 inches, depending on what I'm making. I'll take a scrap piece of yarn and weave it in like a lifeline, like so:

A textured, yellow portion of knitting, with arrows pointing to the grey strand of yarn that's used to denote length.

    The arrows are pointing to areas where it's easier to see the scrap yarn in the photo. In real life, it's much easier to see. I have done similarly by weaving the marking yarn through a decrease/increase and a few of it's neighbors, when I'm tracking how many of them I've worked. There's probably loads of other situations in which this would be helpful, too, that I just don't know about because it's not part of my workflow.
    A simple piece of string woven functions just as well as commercial markers, if kept to a good length (not so short that it easily works it's way out of the stitch, but also not so long that you struggle to keep it from tangling) and it can stay well embedded in the work even through a long project that is brought many places in a project bag, etc. This is also a great alternative when you're traveling because it does not show up on metal detectors or x rays, and security will never question why you have string coming out of your knitting project, though I have gotten comments asking why I have so much metal on my projects while using soda tabs for stitch markers.

What do you use for unconventional stitch markers? Or even conventional ones? Is there something I missed? I'm always interested in hearing new tips and tricks, so let me know your thoughts!

Tuesday, May 20, 2025

Tuesday Tip - Gauge Swatching

     I think we've all been there in our crafting journey. We faithfully make that little tension square, measuring our stitches and rows for reasons that may seem pretty esoteric and mysterious and then, well, what's the point? The swatch always lies anyway! My sweater is too big/too small/ too short but somehow too wide?! So why waste time on the swatch if it's not going to work out in the end anyway? I may as well eyeball it! 

    The problem is, patterns always seem to assume you know how to swatch, but do you? Is the correct method to create the exact number of stitches and rows as asked for and measure how they turn out? Are you supposed to use edge stitches to prevent curling? And actually, wait, what stitch is the gauge stitch anyway? Does it matter? And what hook/needles should I use? The pattern says one thing, but the ball band says another. Which one is right? I will answer all these questions and more to make sure that not only do your swatches never lie to you again, but that you will be confidant enough to make your own swatches and use them to make decisions about your projects. Swatching will transform from a boring chore before you get to the real fun - the project! - to a fun activity all on it's own. So first...


What is a swatch, anyway?

    If you've ever been to a hardware store, you've probably seen the section where they have the little pieces of paper with the different paint colors available, and their names. Those are paint swatches. Or maybe you've ordered fabric or yarn online and asked for (or possibly received as a freebie) a card or booklet of the fabric or yarn, sometimes called a color card, sometimes called a sample booklet, and sometimes called, yes!, a swatch book! Or if you've taken classes in fine art, you've probably had to swatch paints, inks, or markers before.
    A swatch is simply a sample of something, which you use to get a feel for it, and to make decisions with. With paint swatches, you take it home into the room you're thinking of painting, to see how the light in the room makes the color appear. With yarn and fabric swatches, you receive a small sample so you can see the colors, the drape, the texture. Sometimes the samples are big enough that you can wash them and see how they behave before and after. With paint, inks, and markers, you test how they apply, how they layer, how they dry. But what does any of this have to do with knitting and crochet?
    Well, a gauge swatch (or tension square to my friends across the sea) is a sample you're making to see and test the gauge of your work. If you're trying to match a pattern exactly, getting the exact gauge the pattern writer specifies is important. On the other hand, once you become an old hand at swatching, the need to slavishly get gauge diminishes. If you like the fabric you're making with your tools and yarn, but it doesn't match the pattern gauge, this is not an issue for you; you can use your swatch to see how your work behaves, compare it with what you want to copy, and do some grade school math to obtain the same results, but with the fabric you like, rather than the fabric the author got.
    So, how is this possible? And why have my swatches always lied in the past?

It's All a Matter of Technique

    The key to making swatches that don't lie is pretty obvious once you realize it, but until you do, it's an enigma. In order to get the results you want, you have to make a swatch that mimics what you're going to make. In other words, you have to use the same materials and tools to create the same fabric, at the same gauge or tension (meaning, stitch size), using the same stitch, and using the same technique you'd like to use in your project. It's no use swatching in stockinette with a garter stitch edging if what you plan to make has lace, cables, or colorwork. If you had made a stockinette square bounded by garter stitch, the swatch would have prepared you perfectly. However, absent that situation, it cannot have possibly given you the information you needed. Similarly, if you crochet the exact number of stitches and rows called for in the gauge section, even if you do use the exact stitch called for, this swatch will still lie to you. The fabric you are going to be working will be much bigger, with more stitches all around. If you have 1 or 2 inches of fabric, how can you see how it will drape? How it will stretch? Sometimes even have the pattern will look when repeated across the color gradient of your yarn? Simply put, you can't. You have to create something bigger than what you'd like to measure, in order to see how it will behave. The common answer is "at least 6 square inches" and if you're working in DK to worsted weight yarn with tools to produce a fabric that's neither loose nor tight, then this is probably right. But if your yarn is larger than worsted, it might take an even larger swatch to see how the fabric will behave; on the other hand, I often do just 2-4 inch square swatches when working with lace to fingering weight yarns, because the number of stitches required to make a 6 inch square approaches the prohibitive and at this weight, 2-4 inches of fabric is multiple repeats in both directions anyway. So, what do good and bad swatches look like? I have compiled a little gallery of my own swatches below, for the more visual learners.

Swatches that are big fat liars


A small white square of knitting. The center 4 inches are stockinette, and the surrounding is garter stitch, forming a frame.

    This was a swatch for a hat. The hat was not to be stockinette with garter all around, nor even worked flat, so this swatch did not help me. I measured from garter edge to garter edge, both width- and height-wise, and used those numbers. However, you can see in the photo the way the sides bow in and the top and bottom flare out? That is because garter stitch and stockinette do not take up the same amount of space. A garter ridge (that is, 2 rows of garter stitch) is shorter but fatter than the same 2 rows of stockinette, which is comparatively taller and narrower. The two push and pull on each other, distorting both of their dimensions, which means when I moved on to the hat, my math was wrong. My swatch lied! Or, did it? I was asking this swatch a different question than the one I should have asked it. It didn't lie!

A pastel-striped square, again stockinette center with garter edging.

    This would be fine if all I was testing was color placement. But this was for a cardigan, so I was also questioning how many to cast on, what shaping rates I would need, etc. I thought I had solved my original problem, because I made the swatch big enough that I could measure a 1 inch square in the center, away from the edges, and "avoid" the distortion. But the stripes allow you to see that the buckling and distortion carries across the entire row. Making the swatch bigger will not work until the swatch is big enough that you may as well have simply cast on a sleeve (more on that later!) Did my swatch lie? No, I was once again asking it the wrong questions.
    I do not have lying crochet swatches to show, because I am embarrassed to report that the swatching I did back in those days mostly consisted of "chain until it's 'long enough' work one row, and figure out the math from there." This is fine for things like blankets or hot pads, and terrible for anything else. Thankfully, I figured things out before I started trying to crochet things where the size matters. But these same pitfalls apply to crochet too. If the pattern calls for filet crochet, swatching in double crochet is not "basically the same thing" and will not give you the numbers you need, Similarly, trying to make a square that matches the 1, 2, or 4 inch numbers will not work out in the larger project unless all you are doing is one stitch, back and forth, with no shaping, and even then it can be wrong because the way you hold a 2 inch project and the way you hold a sweater project is vastly different, and can change your tension. It sounds silly, I know, but if you've ever had a crochet swatch "lie" to you after trying to swatch this way, then you already have proof that this is true.
    So, what does a good swatch look like? This is a bit like that Tolstoy quote;  good swatches are good swatches for the same reasons, but bad swatches? They're all bad in their own unique ways.

A Good Swatch

    The main thing about swatches that don't lie is that is closely resembles what you plan to make. If you are going to work in the round, so too must be your swatch. If you are going to be working lace, or cables, or mosaic crochet, or whatever, then the swatch also must be too. It must be big enough so you can see what it will look and behave like, it must be washed the way you plan to wash the finished project to avoid growing or shrinking or bleeding surprises, and most importantly, it must be measurable. You will note that I never say "it must be 6 inches square" because in all honesty, some of the best swatches I've ever made were abandoned at an inch or so in. This was just long enough to tell me that something about it wasn't working; maybe I didn't think the yarn meshed well with the stitch, or I found this hook impossible to work with, or actually this is not a color I would wear on a hat. These swatches are just as valuable as the ones I've finished, because they saved me potentially hours of time working on a project that was doomed to fail anyway. In the gallery below, I have included such a swatch, and the reason for it, to give you an idea of when it's time to bail on a swatch.

A purple swatch, the bottom half is garter stitch, the top is moss stitch. The piece measures about 4 inches by 8 inches.

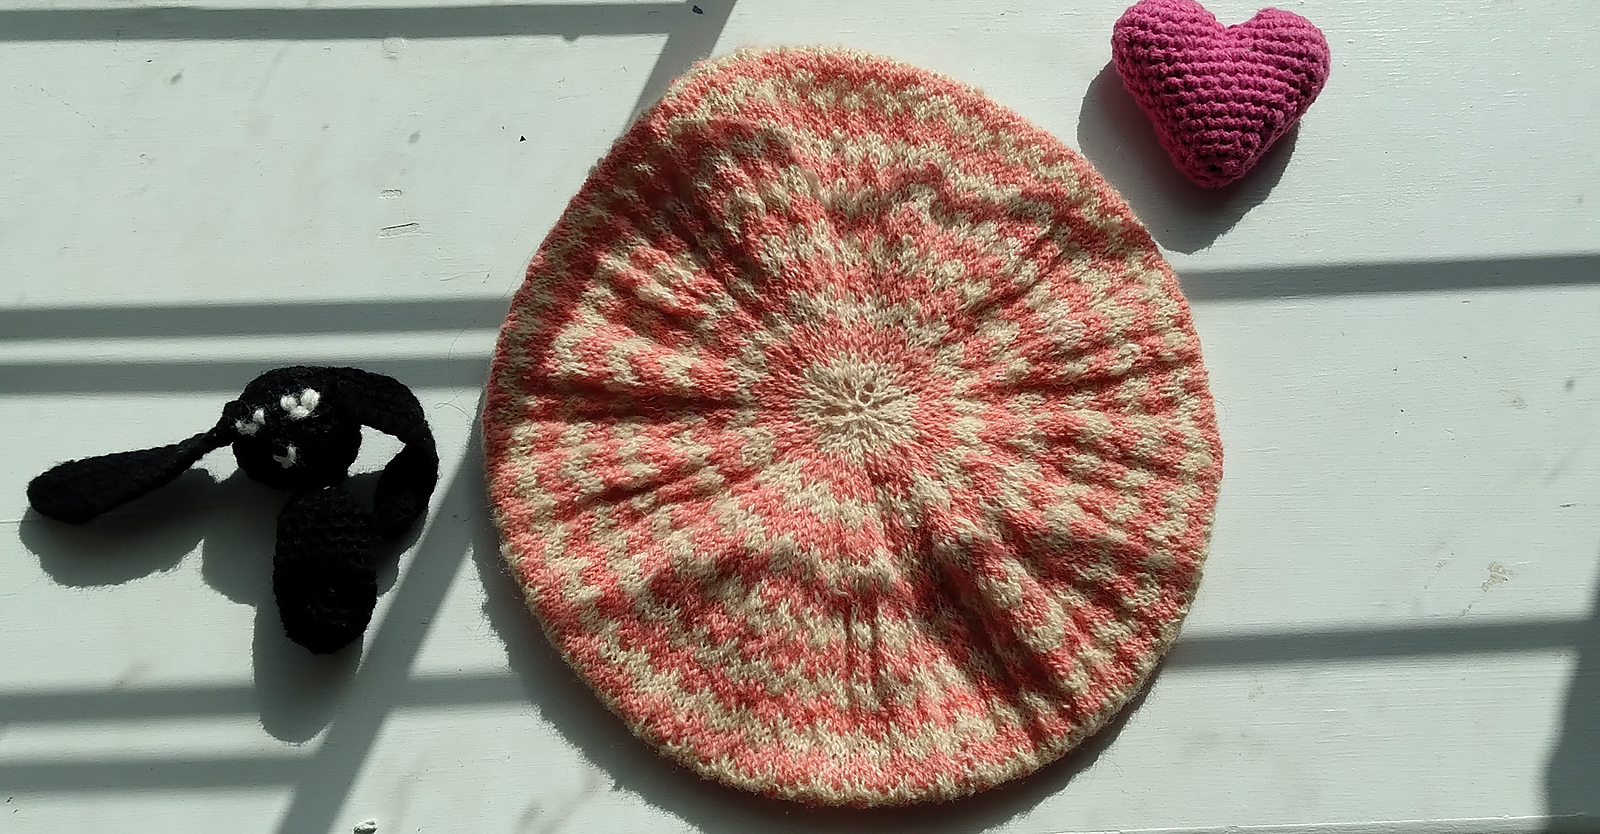
    This was an excellent swatch. I used the exact yarn and needles I was going to use in my project, with the exact stitches I planned to use, in the order I planned to use them. It allowed me to "preview" my hat, see how it draped, how the transition between the two stitches looked, let me determine if there would be any flipping or curling at the transition point, etc. The math checked out with this one, because I asked the swatch the right questions.

Two swatches, both with their colors reversed. On the left, a tawny brown starts off with a lace pattern, then switches to a midnight blue for stockinette and 1 by 1 ribbing. On the right, the midnight blue starts the lace and the tawny brown is the stockinette and ribbing. The brown draws in more than the blue, and opens up more as a lace.

    Another excellent swatch, looking different, but good for the same reason. I was testing both color placement and yarn suitability in these swatches, for a sweater. The swatch on the left won out for me, but they're both good. I was able to see that the brown and blue behaved differently as ribbing, even though they were worked on the same needles, and also behaved differently as lace; the brown seems more open, compared to the blue. from this, I was able to get accurate numbers for all three major parts of the sweater: the lace portion at the collar, the stockinette for most of the body, and the ribbing for the hem and cuffs. They have different gauges which distort each other, which may seem like an issue but the lace will transition to the stockinette, and the stockinette to the ribbing, and it's important to get measurements on how they distort each other in order to know what, if any, measures to take to equalize them. Not shown, but I did also work a swatch of just stockinette in order to see how it differed from the small transition zone in this swatch, and changed my numbers accordingly.

A crochet swatch in royal blue; the work is two circles, crocheted from the center out, in single and half double crochet stitch.

    This crochet swatch taught me two things: the first was that I liked the look of the circle better in single crochet as opposed to half double crochet and the second was that this yarn was too splitty to crochet with. This is an equally valid end to a swatch! Rather than embark on the larger, motif based blanket I was intending to make, I unwound this yarn and used it for what it would eventually become: a knit sweater. Additionally, you can see that it's on a paper towel, because this is a yarn I'd never used before. I had no idea whether the dyes from this dyehouse were wash fast in my water and soap; alkalinity, hardness, and the presence of additives like fluoride or chlorine in the water and protein scrubbers or optical brighteners in the soap can change the fastness of a dye - it is not necessarily a sign of poor workmanship if a skein bleeds in your wash, especially if it seems to happen to every skein. So these swatches also taught me that this dye will not bleed in my wash water, an important consideration if I wanted to use it with lighter yarns.

Swatch of a barbie pink mitten with a rainbow sprinkle ruffle. Various items are on the table along with the swatch, as set dressing and to set a "homey" vibe.

    This is a swatch I did for a mitten. I was curious if my idea for a ruffle at the wrist end of the mitten would work. I did not photograph it, but I finished the ruffle in the way I intended to, and the portion of the mitten you can see here is from my ideal cast on up to the thumb shaping. I played around with the proportions and whether the type of cast off mattered. I knit this portion in total at least 3 times, learning something different each time, that informed how I eventually made the mittens. In this case, had I wanted to, I could have then simply continued on with the mittens from the original direction, but I unraveled it and started over because there were changes I wanted to make to the cast on. However, this is proof of concept of something I will talk about further down, which is that sometimes the project itself can be the swatch.

A light pink knitted swatch in the round, showing 3 sampled needle sizes

    At this resolution it can be hard to see the detail, so click the photo to enlarge it if needed. This is a swatch for a sock, so it was completed in the round, with 3 different needle sizes. I did one row of purl so it would be easier to visually differentiate which sections are in what needle. You can also see that I washed this still attached to the ball. I rarely cut the thread for my knits because I rarely use superwash, so my projects are not going in the machine. I simply put the swatch in the wash bucked and leave the ball sitting next to it. The water does wick some way towards the ball, but it never actually reaches it and if I'm careful to keep the ball dry, it doesn't impact the washing or drying time of the swatch at all. You can also see that unlike the sweater project with a lot of stockinette, this one curls. It's because of the tightness of the gauge; socks require the finest gauge you can muster if you'd like them to have any lasting power, and that causes the stockinette to curl no matter what you do. It's fine to pin the swatch just enough to hold it in place while you measure your gauge, but do not stretch it and pin it to dry that way unless you intend to do that to the finished object, too. It seems like a good idea to make measuring easier, but it leads to a situation where the swatch "lies" because the fabric you measured isn't the fabric you ended up making.

A crochet swatch with six colors, each with a visibly different gauge.

    You can do this with crochet, too. The reason it narrows heading to the right is that each stripe is made with a different size hook. This swatch was serving double duty as color placement demo as well. Combining things like this wherever possible is a great way to save time, if part of the tedium of swatching is time spent away from the best part of any project - starting! -  is what's holding you back.

The Evolution of a Swatch

    This is a series of swatches from idea to final project, to give you an idea of how a swatch can and should work for you, and how you can use it for more than just getting gauge on your patterns, but for making your own projects and patterns from ideas.

A swatching of knitting that features a midnight blue ground with a silver diamond pattern on top

    I knew I wanted to use these two colors together, and I wanted it to have some level of color work, not just stripes. I tried this pattern, but it looked too fussy to me, and I wanted something a little bolder. You can see this swatch is nowhere near six inches. It's probably 2 inches tall by maybe 3 or 4 wide? but it's one full repeat of the chart, which was enough to tell me it wasn't the vibe I wanted. I frogged and started again.

The same yarns, this time with a silver cuff that is very large - about 3 inches - transitioning to blue eyelets, followed by narrow stripes of blue and silver, with silver ribbing at the top where the fingers would emerge.

    The colors reminded me of the sea at night, so I thought "what if I used an edging that looks like waves as the cuff, then worked the rest of the mitt perpendicular?" I liked the idea of the process, but this cuff was way too long, and bulky, and the picots I attempted at the junction just looked awkward. The stripes looked suitably nautical though, so I frogged and remixed once again.

A third iteration, wide enough to do several repeats of the silver cuff lace, two variations of the stranded motif, narrow stripes, and this time garter topped by picot at the finger tips.

    This swatch got me where I wanted to be. The cuff looked "fancy" without being too fussy, it transitioned easily into the anchor motif (which I tried two variations of) and then I tried a different hem treatment at the top because I thought plain ribbing did not match the energy of the bottom cuff well enough. This is the swatch I took my numbers from and used it to create...

A pair of fingerless mitts, clearly derived from the above swatch, containing all the elements in the swatch, in their order.

    ...these mitts. You can see the influences of each swatch along the way, and you can see how each stage was vital in obtaining the end result. "But," I hear some of you asking, "what if I don't want to do all that? What if I just want to make a nice hat or whatever?" I have the answer for that, too.

Sometimes, the Project is the Swatch

    Yeah, that's right. I just said all those words at you, and for what? So that at the end I could say you don't have to do it anyway? Well, not exactly. If you are working on a small project, like mittens, socks, a hat, or even a scarf, there's nothing wrong with taking your best guess at the appropriate tools and starting numbers and just... going for it. If you're prepared to re-evaluate after a few inches, there's nothing wrong with starting even a sweater by starting with one sleeve. By the time you've finished the cuff and an inch or two of the arm, you'll have exactly the same data as if you had swatched. Especially if this is a yarn you use frequently or a pattern you return to often, your instincts combined with double checking yourself is a fine method, and one I've also used plenty of times.
    When you should *not* use it is a different matter. I would suggest not using the project as the swatch in the following scenarios:

  • If you're not prepared to check in at a certain point and re-evaluate. If you just want to start and be off to the races, it sounds counter intuitive, but swatching will actually get you there faster.
  • If frogging your project back to the beginning is something that gives you hives, this method is definitely not for you in any circumstance. You are setting yourself up for frustration and disappointment, so be kind to yourself and treat the swatch as a mini-project for which there is no fail state. That way, when you get to the big project, you can be certain of your success.
  • If the yarn is delicate and/or you have a limited amount of it, swatch first. There is nothing worse than losing yarn chicken, except for losing at yarn chicken with miles and miles of a lace mohair strand to frog. If you end up having to ditch a swatch's worth of yarn, that's usually less than a quarter of a skein. Still a big blow if you have limited yarn or the yarn was pricey, but doubly so if instead you have to rip back a whole yoke, which is potentially a whole skein or more, and find that the yarn is too enmeshed and you've lost the whole thing.
  • You hate making the same thing more than once. Unless you're really lucky, you will be making this item at least twice. If that sounds like torture to you, swatch first. It sounds counter intuitive - isn't the swatch "doing it over again"? No, not if you treat the swatch as one, big, ongoing project which you add to to test colors, yarns, tools, and techniques on until you're satisfied you will be able to complete the "real" project. Doing your swatch in that way is different enough to the final project that it really will feel like a different project, I promise. I also feel like repeating a project is the same as having a tooth pulled (which is what lead me to learn the two-at-a-time method for socks and gloves, among other things), and I love swatching now because it really is a different project every time.

Conclusions

    Swatching definitely has a bad rap, but that's just because a lot of people don't know how variable it can be and it becomes a terrible chore. But it doesn't have to be that way, and now you have the knowledge to turn swatching from "the awful slog at the beginning of your projects that is kind of pointless anyway because it always lies!" to a fun diversion that can become a fun project all on it's own, if you'd like. I hope this helped! If you have any questions or think there's something I can do to make this clearer or more educational, please let me know down in the comments!